This level is all about colors and symbols. Many of the games puzzles have random answers and solutions that I can't give you the answers to. I will describe how those puzzles work in those cases.
This walkthrough will lead you through just one path of doing things, most things in the game can be done without using the sequence laid out here.
When certain things happen some cubes move out of access and you can never get back to them again. Save your game often.
If I lead you to a room and you do not immediately see something I am describing, turn left or right a few times of use the map link below to re-orient yourself.
Please note there is no walkthrough for level 2 (or the rest of the game). If you need more help visit Lazy Laces
Here is a link the Level 1 Map.
Click on each of the paintings orange label plaques and note the YEAR for each painting.
- Girl with a Broom (1651)
- James Monroe (1816)
- Nude Descending Staircase (1912)
Make note of the purple and black cubes on the paintings.
Exit this cube down the curved tunnel.
Later we will get a map of all the possible lever settings, however when the game starts they are set to the RED setting. If we leave them this way we cannot start the red power orb.
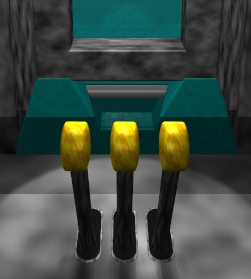
So change them now by pulling all the levers toward you.
Then continue through this cube to the Hatch cube.
The Hatch cannot be opened yet.
Continue forward through this cube.
Click on the valve, wait for the orange liquid to rise and the sound to finish. This has unlocked/pressurized the Hatch you just saw in the previous cube.
Continue forward down the curved tunnel.
The "buttons" are actually the settings for the Levers we passed earlier. Make note of the settings for each color: red, blue, green and yellow. The "buttons" with small black centers mean the lever is toward you for that color, the "buttons" with colors mean the lever is away from you.
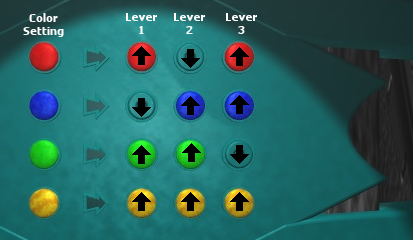
So, for instance, the BLUE setting from left to right is: toward me, away from me, away from me.
Exit this cube back down the curved tunnel. Go forward once to the Hatch Cube. Click on the hatch handle on the right and the hatch should open.
Go down the hatch to the Power Orbs room.
Since the red emitter is working you can press the red button on the red orb to start it. Do this now.
If you hear grinding the levers are set to the red setting. You cannot start an Orb with the levers set for its color. Go back and change them to something else.
Near the red power orb is a circular sounding board with three buttons, red, blue and yellow. When you press a button you hear an odd sound and see a symbol. The symbol you get depends on the status of the power orbs. If you turned on the red power orb, then you get one symbol, if you turn it off you get another. Leave the red power orb on and note the symbol (you can also note the blue symbol now, as it will always be the off symbol since the orb is broken and can never be turned on).
Behind the red power orb is the ladder back up. Go back up now.
Since you started the red power orb, setting the levers to the red setting should do something. If you didn't save yet, then save now, you are about to move the picture cube and you won't be able to go back to it for clues.
Set the Levers to the RED setting (left to right: away from you, toward you, away from you).
You will hear a wind up and a motor and then see the RED cubes move sideways in the window.
The picture cube is now inaccessable.
This brings you to a cube with a code box. You do not have the code yet.
Turn right and walk forward one step. Turn right and you should be in front of a tall purple wall with a button.
Press the button to open the Purple Logic Puzzle.
The clue for this puzzle was the note in the picture cube. If you didn't write it down, restore a save and write it down, then come back here.
Since the answer is random with each game I can't give you the solution, but I can explain how it works.
Your goal is to place all the large tiles on the left on the right in order.
There are two sets of clues with smaller squares on the left and right.
The left clues tell you what tiles are in the same column, but not necessarily the same row. The right clues tell you how tiles relate next to one another on rows and in columns, but not necessarily in the same row or the same column.
WARNING: This puzzle must be solved correctly with each tile you place, if you get one wrong the puzzle closes and randomly selects one of three clue sets and you have to start all over again.
NOTE: To drop tiles accurately, drop them slightly down and to the right of the place you want them to lock into.
NOTE: From the top down, all the letters will be in the top row, the numbers in the second row, the shapes in the third row and the colors in the fourth row. This was at the top of the note and is very important.
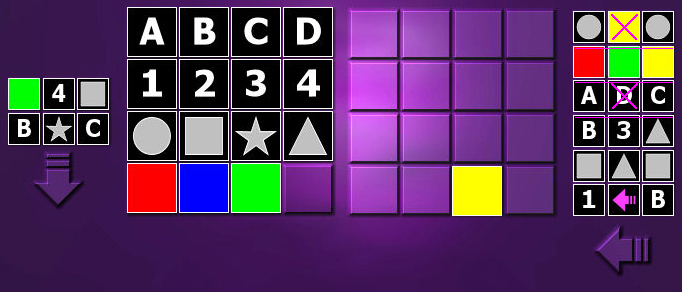
Using the image above we know a few things. The second clue on the right side, reads: Red, Green, Yellow are next to one another and we already have Yellow. So...
- The Green Tile goes to the left of the Yellow.
- The Red Tile goes to the left of the Greeen.
- The Blue Tile must go to the right of the Yellow.
That row (if you did it) would be set correctly.
Using the image above again, the third clue on the right, reads: The A and C are one column apart and the D is not in the column between them.
Once you solve it a door will open with a blue crank in it. Take the crank.
[To get back, face the purple wall, turn right, forward once (the code box cube), turn left, foward two times down the tunnel, take the right tunnel at the Hatch cube and turn left]
Set the levers to the Blue Setting (left to right: toward you, away from you, away from you).
Turn left, go forward to the Hatch cube and then take the right tunnel.
Turn left and you can see a window, the code for the code box is written on the outside of the blue cube, but it's too far away to read. We need to move the blue cube closer to the window. Since the Blue power orb is broken you have to do it by hand. That's what the crank is for.
Turn right and walk forward.
Turn left and you should see two small closed panels in the wall. One panel has a picture of what is about to happen.
You are about to move the cube with the blue wall closer. You can click on this to magnify it, then leave the close up with the small down arrow in the corner of the screen.
Now click on the seam between the two panels and they should open up, revealing some broken gears. Ignore the fact that they are broken. The crank will still work.
Click one time on the crank in your inventory to light it up. Now click on the gear with the square slot on it and the crank should click into place.
Click on the handle to turn the crank. If you hear a grinding sound you did not set the levers to the blue setting.
After the animation and some sounds the blue cube is moved. The crank disappears and the panels close.
Before you leave here, turn around, or left twice and magnify the mosaic. Make a note of this in as much detail as you can. You can return here later if you need to.
You are done here. Leave this cube and turn right and read the code for the code box.
The code is different each time so I cannot give you mine.
Walk foward and turn right to the fuse box. Click on the fuse in your inventory to light it up.
Click on the blank spot in the fuse box to insert the fuse.
You will hear an electric sound.
Turn right and back down the tunnel to the Hatch. Open the hatch and go down.
You can now start the yellow power orb. Do this now. If you hear grinding the levers are set to Yellow or Green, go back and change them to something else like Blue or Red.
Return to the circular sounder near the red orb and press the yellow button. Write down the symbol you see after the sound plays.
At this point you have symbols for the red orb on, blue orb off, and yellow orb on.
Go back up to the Hatch cube. Go forward to the Levers cube and then forward down the curved tunnel.
Turn around and go back to the Levers cube.
Set the levers to the Yellow setting (left to right: away, away, away)
Turn right and back into the curved tunnel and the yellow symbol is now lit up. Click on it.
This opens the mosaic puzzle. The clue for his puzzle is in the Gears cube.
Put the squares in the same order as the mosaic on the wall in the Gears cube using the yellow buttons on each side and top and bottom to move the rows and columns around.
Again it's random each time, so I can't give you a solution.
| From a posting at LazyLaces |
|
One way to do the mosiac puzzle is row by row, starting from the top down:
Set up the first row correctly, then, when you are working on the next row, move a tile horizontally until its to the left/right to the place where you want to place it, but one tile down. Next you push down the column where the tile should be, until the wrong tile that was in the place the tile you're are about to place should be, comes inline with that tile, then move that row to the right, then move the column back again. |
Turn right and open the panel on the wall. Magnify the puzzle.
I recommend saving here as getting the final answer is a bit hard.
You must enter the symbols from the power orb room. You will not have the green one, since there are only 8 symbols, try each one to get the green one. Pressing the white button on the bottom to test.
You will need to recall the symbols and the pictures of 8 squares on the right of each one.
But when you enter them all correcly and hit the white button the puzzle closes and you can't write down the green symbol or the squares. So do the puzzle and recall what green symbol worked, then reload the game and do it again and BEFORE you press the white button write down the 8 squares layout.
This opens the panel on the right. Take the green lens and leave this cube down the curved tunnel.
Before you go on, turn right and set the levers to the Green setting (left to right: away, away, close).
Turn left and go forward to the Hatch cube and take the left tunnel. Forward once, turn right, forward once and turn left.
Insert the green lens into the emitter.
Pull the green lever. If you hear grinding then you did not set the levers for the green setting.
You should hear a wind up, a motor and see the green cubes slide sideways opening the tunnel for you.
Go down the tunnel and turn left. Walk forward to the Elevator cube. The call button is not working.
Remember the years on those paintings?
Remember those purple and black cubes on the paintings?
On the first painting from the left all four blocks were purple. Enter the year from that painting in the top row of the code. If it's correct the code turns green and locks. The code on this part of the puzzle never changes. The year from the "Girl with a Broom" is 1651.
Now you need the next 4 digits of the code. On the last two paintings only two of the four cubes where purple. This tells you you want some of the digits from the painting year and not others. You want the purple ones. You want the last two digits from the "James Monroe" painting and the first two from the "Nude Descending..." painting or 1916.
This should activate the elevator call button.
Before pressing the elevator call button SAVE YOUR GAME!